Quick Start
Your First EMOS Recipe
EMOS lets you describe complete robot behaviors as recipes – pure Python scripts that wire together components, models, and ROS topics using a declarative style.
In this quickstart you will build a simple Visual Question Answering recipe: a robot that sees through its camera and answers questions about what it observes. By the end, you’ll have run it end-to-end and (optionally) opened a small web UI to talk to it.
Important
This guide assumes you have already installed EMOS. If not, see the Installation guide first.
The Recipe
Save the following as my_first_recipe.py. We’ll walk through what each section does, then list what needs to be running before you launch it.
from agents.clients.ollama import OllamaClient
from agents.components import VLM
from agents.models import OllamaModel
from agents.ros import Topic, Launcher

# Define input and output topics (pay attention to msg_type)
text0 = Topic(name="text0", msg_type="String")
image0 = Topic(name="image_raw", msg_type="Image")
text1 = Topic(name="text1", msg_type="String")

# Define a model client (Ollama in this case)
qwen_vl = OllamaModel(name="qwen_vl", checkpoint="qwen2.5vl:latest")
qwen_client = OllamaClient(qwen_vl)

# Define a VLM component (a node with a particular functionality)
vlm = VLM(
    inputs=[text0, image0],
    outputs=[text1],
    model_client=qwen_client,
    trigger=text0,
    component_name="vqa",
)
vlm.set_topic_prompt(text0, template="""You are an amazing and funny robot.
    Answer the following about this image: {{ text0 }}"""
)

# Launch the component
launcher = Launcher()
launcher.add_pkg(components=[vlm])
launcher.bringup()
Step-by-Step Breakdown
Define Topics
Every EMOS recipe starts by declaring the ROS topics that connect components together. Components automatically create listeners for input topics and publishers for output topics.
text0 = Topic(name="text0", msg_type="String")
image0 = Topic(name="image_raw", msg_type="Image")
text1 = Topic(name="text1", msg_type="String")
Note
On a real robot, change image0’s name to match the topic your camera driver actually publishes (e.g. /camera/color/image_raw). The “Before You Run” section below explains how to confirm what’s available.
Create a Model Client
EMOS is model-agnostic. Here we create a client that uses Qwen2.5vl served by Ollama:
qwen_vl = OllamaModel(name="qwen_vl", checkpoint="qwen2.5vl:latest")
qwen_client = OllamaClient(qwen_vl)
Tip
If Ollama is running on a different machine on your network, specify the host and port:
qwen_client = OllamaClient(qwen_vl, host="127.0.0.1", port=8000)
Configure the Component
Components are the functional building blocks of EMOS recipes. The VLM component lets you set topic-level prompts using Jinja2 templates so you can shape the model’s behavior per-input:
vlm = VLM(
    inputs=[text0, image0],
    outputs=[text1],
    model_client=qwen_client,
    trigger=text0,
    component_name="vqa",
)
vlm.set_topic_prompt(text0, template="""You are an amazing and funny robot.
    Answer the following about this image: {{ text0 }}"""
)
Launch
Finally, bring the recipe up:
launcher = Launcher()
launcher.add_pkg(components=[vlm])
launcher.bringup()
Before You Run
The recipe needs three things in place before it can do anything useful.
1. Ollama is running and the model is pulled.
curl http://localhost:11434/api/tags    # is Ollama up?
ollama pull qwen2.5vl:latest            # pre-fetch the model
2. Something is publishing on the camera topic.
On a development machine, ROS 2 USB Cam is a quick way to publish from a webcam. On a real robot, start your camera driver – see Preparing Your Hardware for mode-specific instructions, including the container-mode caveat that drivers run inside the container.
Confirm a publisher is up and producing frames at non-zero rate:
ros2 topic list
ros2 topic hz /image_raw                 # or whatever name you set in the recipe
If the topic name your driver publishes differs from image_raw, update image0 in the recipe to match.
3. Component-specific extras. Some clients prompt for additional Python packages on first launch – the script will throw an error and tell you exactly what to install.
If any of these fail when you run the recipe, see Troubleshooting for sensor verification and model-server gotchas.
Run It
Two ways to run, pick by purpose.
Option A: just run the script
For fast iteration while you’re shaping the recipe. Works in Native and Pixi modes.
source /opt/ros/jazzy/setup.bash       # or your installed distro
python3 my_first_recipe.py
# Activate the EMOS pixi env without leaving your recipe's directory
pixi shell --manifest-path ~/.local/share/emos/pixi.toml
source ~/.local/share/emos/install/setup.sh   # adds the built EMOS packages to your env
python3 my_first_recipe.py
Direct python3 from the host does not work in container mode – the agents, kompass, and ros_sugar Python packages live inside the container. Use Option B, or docker exec -it emos-container bash first and run the script from there.
Option B: run it through the EMOS flow
For sensor verification, log retention, and visibility on the dashboard. Required in container mode.
mkdir -p ~/emos/recipes/my_first_recipe
cp my_first_recipe.py ~/emos/recipes/my_first_recipe/recipe.py
emos run my_first_recipe
The recipe now appears on the dashboard’s Recipes → Installed tab, and every run is logged to ~/emos/logs/my_first_recipe_<timestamp>.log.
See also
Running Recipes – the full comparison of both flows, install-mode pitfalls, and the optional manifest.json schema (display name, description, Zenoh router config).
Verify It Is Running
From a separate terminal, use standard ROS 2 commands to confirm the node and its topics are active:
ros2 node list                          # should list the `vqa` node
ros2 topic list                         # should list text0, image_raw, text1
To trigger a single inference manually, publish a question to text0 and watch text1 for the reply:
ros2 topic pub --once /text0 std_msgs/String "{data: 'what do you see?'}"
ros2 topic echo /text1
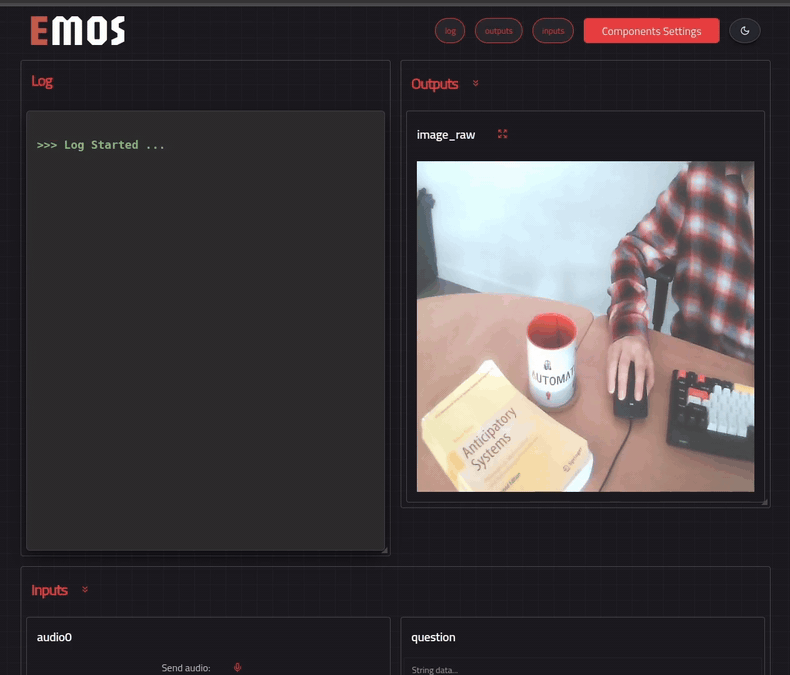
Add a Web UI
EMOS can dynamically generate a web-based UI for any recipe – so you don’t need a terminal to interact with it. Add one line before bringup() to tell the launcher which topics to render:
launcher = Launcher()
launcher.enable_ui(inputs=[text0], outputs=[text1, image0])  # <-- specify UI
launcher.add_pkg(components=[vlm])
launcher.bringup()
Note
The web UI requires two additional packages:
pip install python-fasthtml monsterui
The UI is served at http://localhost:5001 (or http://<ROBOT_IP>:5001 if running on a robot). Open it in a browser, send a question via the input field, and you should get a reply generated by the Qwen2.5vl model.
Where Next
Checkout your EMOS dashboard Open the EMOS Dashboard at
http://emos.local:8765(or scan the QR printed byemos serve). Pair once and you can pull recipes, launch them, and watch logs from any browser. See Dashboard.Customize this recipe. Running Recipes covers the optional
manifest.jsonand the install-mode reference for all runtimes.Build something more capable. The Recipes & Tutorials section walks through conversational agents, semantic memory, navigation, manipulation, and the Cortex agentic harness.
Hit a snag? See Troubleshooting for sensor verification failures, model-server timeouts, and mode-specific issues.